


Best camping gear on tour: My practical motorcycle camping setup
- Oly Truman

- Jul 29
- 7 min read
Finding the best camping gear on tour can open a proper can of worms. There are thousands of choices, plenty of clever marketing claims and a lot of kit that sounds brilliant until it has to fit on a motorcycle and be packed away before breakfast.
I have tweaked my own setup over the years through motorcycle trips in Spain, Portugal and beyond. This is not about carrying the lightest possible gear at any cost. It is about taking kit that is comfortable, dependable, compact enough for the bike and quick to use when I am tired after a day in the mountains.
Start with a tent that gives you room
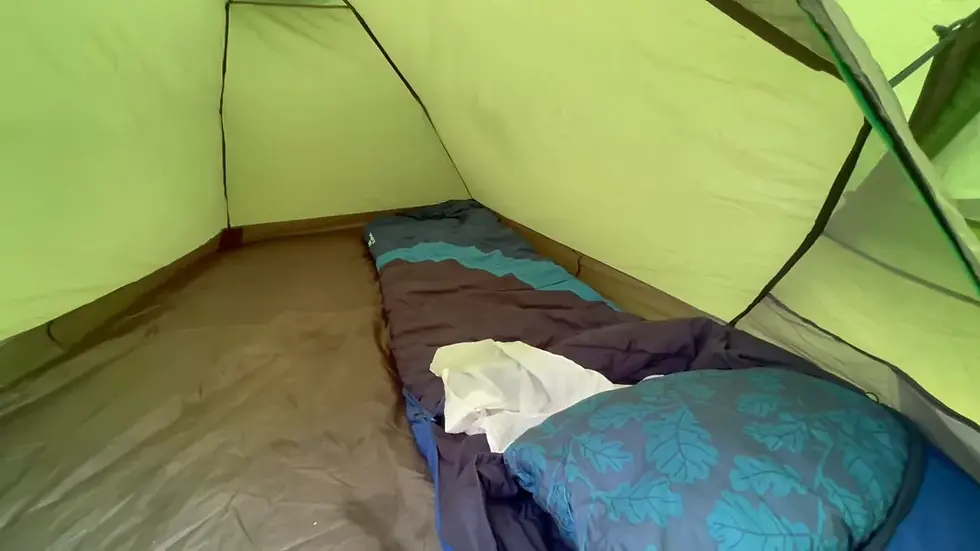
For my idea of the best camping gear on tour, the tent comes first. I use a three person tent, even though I certainly would not want to put three grown men in it.
A one person tent can work perfectly well, and so can a two person. I simply like the extra room. On some tours I set up a base camp in places such as the Picos de Europa and stay for two or three nights. I can leave my boxes in the tent, ride the twisty roads without luggage and come back to a comfortable camp.
Even when I am moving from place to place every day, that extra space matters. I have room for luggage, riding gear and somewhere to spread out without feeling as though I am sleeping in a suitcase.
Choose serious waterproofing
When comparing tents, look at the hydrostatic head rating. It is simply a measure of how much water pressure a fabric can withstand before water comes through it. A rating of 1,000mm means the material withstands the pressure of a one metre column of water.
I choose a tent with a 5,000mm hydrostatic head. That gives me strong waterproofing without getting into silly-money territory. When the weather turns overnight, I want to know I have made the right choice before I zip myself in.

Why I prefer a dome or geodesic tent
I am not a huge fan of tunnel tents for motorcycle trips in Spain and Portugal. They are often lighter because they use fewer poles, but they rely heavily on guy lines and pegs. The trouble is that the ground can be unbelievably hard. Sometimes there is simply no chance of getting a normal tent peg into it.
I prefer a dome, semi-geodesic or fully geodesic design. Those names really refer to how many times the poles cross. My tent has three poles crossing three times, which makes it remarkably rigid and stable.
That structure gives me a very useful advantage. Once the poles are in, I can lift the tent and move it around to find the best position before securing it. I can choose a flatter place for my bed, point the tent towards a better view, or put the back into the prevailing wind. If rain comes in sideways during the night, I would rather it hit the rear of the tent than blow through the entrance.

Do not rely on lightweight pegs alone
Hard ground is a recurring issue, so I carry tried and tested six inch nails. They are tougher than the usual lightweight aluminium pegs, and I can normally get them into the ground somewhere, even when conditions are difficult.
My tent does not need many pegs. I generally secure the front two points, and if I cannot get anything into the ground, I can run a guy line around a rock, a brick or another solid anchor. On good ground I add more pegs for extra security, but I am not dependent on them to make the tent stand up.
Pitch inner and outer together
Another small detail makes a big difference. I like a tent where the inner and outer pitch together and remain attached.
With some tents, the inner goes up first. If it is raining, the sleeping compartment gets wet before the flysheet ever goes on, which makes no sense to me. Others require the outer to be pitched first and the inner hung inside afterwards. That feels like erecting two tents.
A pitch-together tent is the simple option. Rain is less of an issue during setup and when I am ready to move on, it all comes down together and goes straight into the pannier.
Sleeping comfort without filling the panniers
A good night matters. It can be the difference between enjoying the next day’s ride and feeling like you have already done a full shift before putting your helmet on. The best camping gear on tour is gear that earns its space, and a bulky camp bed did not earn mine.
I used a cheap folding camp bed a few times, then gave up on it. It was too heavy and too bulky for what it offered. I also travelled for years with a self-inflating mattress. The idea sounds great, but the reality was a bit of a faff.
A self-inflating mat contains foam inside an airtight shell. Open the valve and the foam slowly expands, drawing in air. In practice, it can take a long time, and I still found myself blowing into it to make it firm enough. That means putting damp breath into the mattress too. It was bulky, not as comfortable as I hoped, awkward to unpack and a pain to roll tightly enough in the morning.
My inflatable mattress choice
I now use an Exped inflatable mattress, which was one of those purchases that turned out much better than expected. It is not the cheapest option, but it weighs next to nothing, packs down very small and is properly comfortable.
It has a built-in hand pump. I unroll it, open the valve and pump it with my hand while sitting there with a brew or a beer. A few minutes later, it is ready. No inflated bulk taking over the bike and no tedious wrestling match to pack it away. *edit - I have now bought a cheap little pump. Takes seconds.

My sleeping bag, liner and pillow arrangement
I use a three season sleeping bag with a wide mummy shape. A mummy bag packs smaller, which is ideal on a motorcycle, but a standard narrow one can feel restrictive. The wider version gives me a sensible compromise between packing size and sleeping comfort.
I always take a sleeping bag liner. It is not really about extra warmth. It is about cleanliness. The liner is light, easy to rinse out and easy to hang up in the morning. By evening, it is dry and I have a fresh, clean layer to sleep in.
I also take two pillows:
A small inflatable pillow that packs down very small.
A proper fluffy pillow to put on top
an edit here...I now take a memory foam pillow from Decathlon. It is made up of very small, recycled foam pieces and is super comfy. Not the smallest, but worth it, for me.
The hood on the mummy bag holds them nicely in place, and that makes the sleeping setup far more like a real bed than a night on the floor.
Cooking gear: choose fuel you can always find
Cookers are another area where everybody has an opinion. For years I used gas canisters, and they work very well until they do not. On one Spanish tour, the Devil’s Breath tour, I ran out of gas and found it harder than expected to locate a replacement.
That was enough for me. I changed to a Coleman multi-fuel stove. It costs more than a basic gas setup, but it will run on petrol. I can get petrol from a garage virtually anywhere and in a real pinch I can get it from the bike. A camping shop with the exact gas canister I need is not always nearby.
If I were only away for a few nights and making a coffee each morning, a small gas canister would likely last weeks. But for touring, fuel availability matters more to me than the initial price.
My breakfast setup stays basic:
Multi-fuel stove
One litre kettle
Water from the campsite
Packets of coffee 2-in-1 coffee powder
Sweeteners
Lightweight cup
That is enough for a hot drink wherever I stop. Simple is often the best camping gear on tour approach.

Seating: pack small or use the panniers
I used to carry a sturdier camping stool that I bought near Malaga. It was comfortable, but it was just too big and too heavy for the bike. Hard luggage already provides useful furniture anyway. A pannier makes a perfectly decent seat and a top box can serve as a table for a brew or a game of cards.
If I do want a dedicated seat, I now take a tiny folding stool. It is incredibly small and light, but opens into a useful little perch. That is the sort of practical item that belongs in the best camping gear on tour list: no unnecessary weight, no wasted room and useful when I need it.

My motorcycle camping checklist
My own version of the best camping gear on tour has come from repeatedly removing what is awkward and keeping what works. The final kit is straightforward:
Three person dome or geodesic tent with a 5,000mm hydrostatic head
Strong nails and flexible guy-line anchoring options
Pitch-together inner and outer tent design
Compact inflatable mattress with built-in pump
Wide mummy three season sleeping bag
Washable sleeping bag liner
Inflatable and fluffy pillows
Multi-fuel stove, kettle, cup and coffee supplies
Small folding stool, with panniers and top box doing the rest
The main lesson is not that everyone needs exactly this kit. It is that every item should justify its place on the bike. Prioritise comfort where it genuinely improves the trip, dependability where conditions can catch you out, and simplicity when it comes time to pack up and get riding again.
After years of altering the setup, this is the best camping gear on tour arrangement I have found for myself: spacious enough to enjoy, compact enough to carry, and reliable enough to take into the mountains.

That is all excellent and concise advice, Oly. Nothing like personal experience to teach you the hacks.